This is the second post in a series on building you own blog with Jekyll, using the Shop Ireland News blog as a case study.
In part one, we covered the set up of your local development environment, using a CSS framework and creating blog posts. In this post I will add some finishing touches to the main blog page, add further interactivity and then publish to the wild web.
Table of Contents
- Progress so far
- Pagination
- Comments
- Icons
- 404 Page
- Social media and sharing
- Going live
- Ongoing workflow
Progress so far
To recap what we have covered so far, we should have a working Jekyll-based blog running on our own computer. With a layout for the home page, and another layout for the posts page, we should be able to create new posts and add content to the posts. Those posts should be showing on the home page and be linked to their own posts pages.
Next we’ll improve the home page by adding some pagination.
Pagination
Jakyll includes some basic pagination that can be used to control how many posts are displayed on a page at a time. The first step in adding pagination is to add a setting to your \_config.yml file:
paginate: 5
This would tell Jekyll to make five pages available at a time. You might need to restart your Jekyll service in terminal, by stopping it (Ctrl+C), then running it again with jekyll serve --watch.
The paginate setting tells Jekyll to make available some information to the liquid templates our pages use. We’ll use this to create some previous and next links on the page. Open the index.html (home page) file and add the following where you’d like the links to appear:
<!-- Pagination links -->
<nav class="pagination">
{% if paginator.previous_page %}
{% if paginator.previous_page == 1 %}
<a href="/" class="previous">«</a>
{% else %}
<a href="/page" class="previous">«</a>
{% endif %}
{% endif %}
{% if paginator.next_page %}
<a href="/page" class="next ">»</a>
{% endif %}
</nav>
This consists of a navigation element that works out whether there’s a previous or a next page, and shows the corresponding link as appropriate. It can be used on any page that also includes a loop displaying the blog’s posts. The loop code looks like this:
{% for post in paginator.posts %}
  ... your post list HTML ...
{% endfor %}
Within this loop you can access any of the posts settings using the post.value syntax where value is the a variable in the frontmatter at the top of the post’s file. Find more information on Jekyll’s frontmatter.
Comments
Blogging platforms like Wordpress ship with comments systems built in. Since the blog we’re working with is made up of static HTML pages, we don’t have the option. However there are some great JavaScript-based services.
A popular solution is Disqus. It’s easy to set up, includes full comment administration tools, and best of all, free.
To get started select “Add Disqus to Your Site”, and register your site. When you’ve completed setup you’ll be given a JavaScript snippet. Place it in the posts.html layout template, where you’d like the comments to appear, and you’re done.
Icons
With the page content in place for a blog home page, individual blog pages, and on-page styling, it’s time to turn our attention to some of the small details that show you really care. Let’s make an icon to appear in people’s bookmarks and at the top of the browser, the favicon.
When making a favicon, it’s worth keeping in mind that it’s going to be really small. Select something, whether it’s your logo, or a symbol that represents it. In my case I chose to put together the letters SI to stand for Shop Ireland. The result is this:
It’s a favicon.ico and is sized 16 by 16 pixels.
To make this, begin with a square canvas in photoshop or your editor of choice. It’s usually easier to start with something bigger than 16 pixels (I would suggest about 500px by 500px), and we’ll scale it down later. Once you’ve assembled an image, the quickest way to generate the favicon itself is to upload it to Iconifier.
It will shrink the file down to 16 pixels and you can then download the resulting .ico file. Place this file in the root of your blog project.
With that made, the following line in the head of your HTML will direct the browser to look for it:
<link rel="shortcut icon" type="image/x-icon" href="/favicon.ico">
Other icons
Happily enough, the Iconifier service will generate more icons for us, including the various “Apple touch icon” icons that appear when someone adds your page to their phone homepage. There are multiple variations in file size to allow for the different needs of iPads, phones, etc, and all these files can live in the root of your blog.
404 page
We have most of the important pages covered so far, but one that you should always remember is the “Page not found” page. This is the page that is shown when someone mistypes a URL, or perhaps when someone moves content and forgets to put in place a redirect. The purpose of this page is to let your visitor know they’ve landed somewhere where there isn’t content, and help them get to somewhere they’d rather be.
To begin, create a 404.html file in the root of your blog project. Jekyll will automatically show this page when any incorrect URLs are hit.
The contents of your 404.html file could look like this:
---
layout: default
title: Page not found
---
<article>
  <header id="404">
    <h1>Page missing</h1>
  </header>
  <section class="entry">
   <p>Sorry about that, it seems there's something missing. Please <a href="/">continue to the homepage</a>.</p>
  </section>
</article>
This basic page will let people know what happened. Many choose to do something more fun with their 404 pages, and it’s often a chance to be a little more silly than you might get to be on the more public pages.
Social media and sharing
Depending on your site’s goals, you may want to plug in some social sharing and links to social profiles. This is something that depends on how you want your site to be perceived, and it’s up to you how you approach this. On Hop.ie.
The Shop Ireland News blog however, is a commercial venture and is better suited to having some obvious social stuff on the pages. The quickest way I have found to do this is to use a service such as Addthis Smart Layers.
To set up Smart Layers, use the Addthis form to set up your chosen social network IDs, and select the way you’d like them presented on the page. It will generate a JavaScript snippet you can paste into your site. In this case, I added the code to the default.html layout file as I’d like the social buttons to appear on every page. Simple!
Analytics
The last thing I would typically do before launching, after doing one last visual check of every page, is add in some Google Analytics. This is a helpful service that lets you see how many visitors you are getting, from where, and when. If you are writing blog posts and want to judge which are working and which aren’t, this service will help.
To use Analytics, you’ll need to register and follow Google’s set up instructions for a new account. After setting time zone and naming the account, you’ll be given another JavaScript snippet to add to your page.
It’s up to you whether you want to add the JavaScript to the head or the bottom of your HTML. Keep in mind that JavaScript calls can slow down the rendering of a page, so while putting the tracking in the head might catch the people who leave before the page renders, it might also make the page slower. For this reason I would usually put the JavaScript at the end of the page, before the closing body tag.
In this case I’d put it in the default.html layout file as the tracking can then note every page view on the site.
Going live
With all this in place, we’re ready to unleash our creation on the web. To do this, you’ll need a domain name. If you haven’t chosen one yet, I’d recommend using a service such as Name.com or Hover.
With the domain name chosen, you need a hosting service. Since Jekyll was built by a founder of Github, you can host your Jekyll blog for free with Github’s Pages. This is the option I chose for this project and it seems to work pretty well.
Before deploying your site to Github, you’ll need to create a CNAME file. This file will tell Github what URL you’d like to use. For example, the CNAME file for Hop.ie can be seen here.
Once you’ve created this file, we can get all the files ready to send to Github.
Pushing files to Github
You’ll need a Github account. Once you’ve signed up and logged in, select the “Create a new repo” button on the top-right:
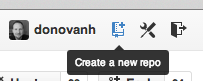
If this is your first time setting up a Github page, the easiest way to do so is to call your repo username.github.com, where username is your chosen Github username. Give it a description, I would also usually leave it set to “public”. You won’t need the README.
You’ll then be given some set up instructions to get your project pushed. Before following them, I’d recommend navigating to your project in a terminal window, and running this command to clear away any existing git stuff:
rm -rf ./.git
This command will remove the hidden git folder, giving you a clean slate. The instructions from Github will then step through initialising the new Git repo, adding a remote (the place to push the files to), and adding a commit.
You’ll need to all all the project files, so after following the Github instructions, you’ll need to do this also:
git add --all
git commit -am "Adding all the files"
git push origin master
This will add all your files and push them up to the Github repo.
Pointing your URL
With the Github repo in place, we can tell our web address where to find the site. You’ll need to add an “A” record with your domain name registrar. Github has full instructions on setting up the DNS.
With the domain name pointed, you may need to wait an hour or two for that to kick in. All things going well, you’ll have a live blog!
Ongoing workflow
As you continue working on your blog, you can push changes up to Github and the changes will appear on the site. The git workflow is worth investing a little time into becoming familiar with.
Once you are happy with the structure of your blog, adding new posts is then a case of creating a new file in the _posts folder, adding the frontmatter and your awesome writings, then adding the files with git and pushing up to Github.
Questions
If you’ve enjoyed this article, or have any questions you’d like to follow up on, by all means let me know. I can be reached by email or on Mastodon and am always delighted to hear from you.